
209 lines
27 KiB
Markdown
209 lines
27 KiB
Markdown
---
|
|
version: "Rev D_v1.3"
|
|
language: "en"
|
|
---
|
|
# Bypass and Controller Assignment
|
|
|
|
Please check out the video below for an overview of creating assignments, then read on for additional details on this page.
|
|
<https://youtu.be/yFQiy00AvyY>
|
|
|
|
## About Bypass and Controller Assignments
|
|
|
|
Helix Stadium provides a wide variety of tools for controlling your tone during a performance. The most obvious two are stomp switches (to turn effects on and off) and expression pedals (to dynamically control wah or volume). But stomp switches, expression pedals, incoming MIDI CCs or notes, the [**XY Controller**](https://manuals.line6.com/en/helix-stadium/live/bypass-and-controller-assign.md#377e08e1-7fcb-493f-86d4-0b9867d8d8cf), and even drum triggers and contact microphones can be used to control the bypass states and parameters of your various blocks. You can even have parameters instantly change when selecting different snapshots within a preset.
|
|
|
|
By default, adding an effect, Looper, or FX Loop block automatically assigns it to the first available Stomp A switch (or if Stomp A is full, the first available Stomp B switch). If you'd prefer to assign Stomps manually, set [**Global Settings \> Switches/Pedals**](https://manuals.line6.com/en/helix-stadium/live/global-settings.md#globals-switchespedals)**\> Assign FX to Stomps** to **Manual** (see below).
|
|

|
|
|
|
In addition, adding a Wah, Pitch Wham, or Poly Wham block automatically assigns its Position parameter to be controlled by EXP 1. Adding a Volume Pedal or Pan block automatically assigns its Position to be controlled by EXP 2; the hidden EXP Toe switch toggles between Wah/Pitch Wham and Volume/Pan.
|
|
|
|
## Assigning Bypass/Control
|
|
|
|
There are several ways of quickly assigning block bypass and parameter control.
|
|
|
|
### Quick Bypass Assign
|
|
|
|
1. From the Home \> Edit screen, **select the block you want to assign to a stomp switch**.
|
|
|
|
* Input, Output, and Merge blocks cannot be assigned to footswitches.
|
|
|
|
* Any Split block type *can* be assigned to a footswitch; when bypassed, the signal is split and routed equally to both Path A (upper) and Path B (lower).
|
|
|
|
2. **Select Stomp A or Stomp B footswitch mode (if not already there).**
|
|
|
|
3. **Touch and hold (but don't press) the desired footswitch.** The Stomp Assign dialog appears (see below).
|
|
|
|
* If you want to replace any other assignments that may already be on the switch, tap **Replace** . Otherwise, leave it set to **Merge**, which allows for multiple items to be assigned to the same switch.
|
|
|
|
* If you want to make the switch momentary ---that is, it changes state only while being held ---tap **Momentary** . Otherwise, leave it set to **Latching**, which toggles the switch's state every time it's pressed. Note that footswitch type (Momentary or Latching) is determined per footswitch, not per assignment.
|
|
|
|
* If you'd like to relabel or color the stomp switch, tap **Label/Color** . The keyboard appears. **Enter the name and tap Done**  **.**
|
|
|
|

|
|
|
|
4. **Tap Assign Block.**
|
|
|
|
**Tip:** You can also "merge" 2 or more blocks' assignments to a single stomp switch---see [**Merging Blocks' Switch Assignments**](https://manuals.line6.com/en/helix-stadium/live/building-and-editing-tones.md#merge-assignments).
|
|
|
|
### Learn Bypass
|
|
|
|
1. From the Home \> Edit screen, **select the block you want to assign to a switch**.
|
|
|
|
* Input, Output, and Merge blocks cannot be assigned to switches.
|
|
|
|
* Any Split block type *can* be assigned to a switch; when bypassed, the signal is split and routed equally to both Path A (upper) and Path B (lower).
|
|
|
|
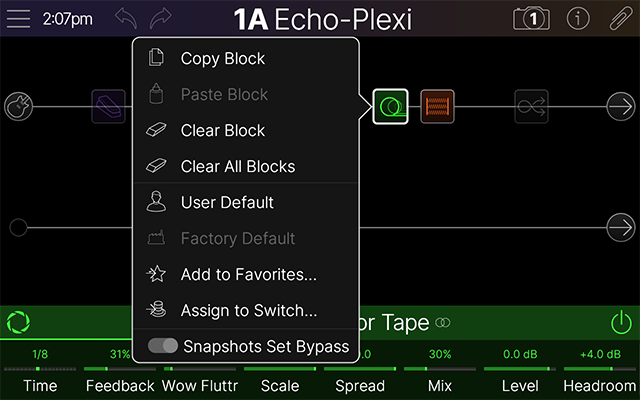
2. **Tap the selected block again.** The Action Panel appears (below left.)
|
|
|
|
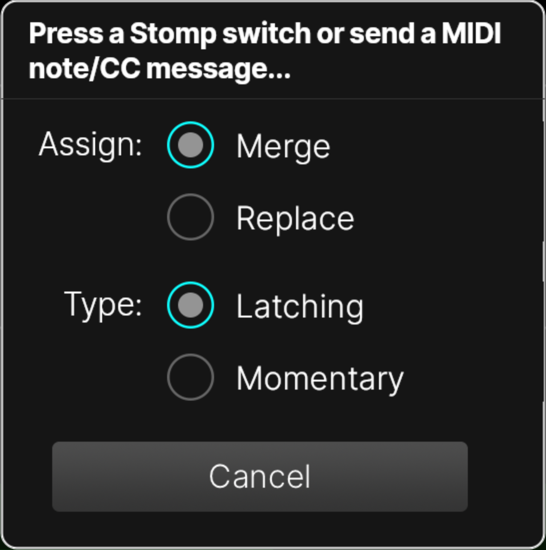
3. **Tap Assign to Switch...** The Assign to Switch dialog appears (below right).
|
|
|
|
* If you want to replace any other assignments that may already be on the switch, tap **Replace** . Otherwise, leave it set to **Merge**, which allows for multiple items to be assigned to the same switch.
|
|
|
|
* If you want to make the switch momentary---that is, it changes state only while being held---tap **Momentary** . Otherwise, leave it set to **Latching**, which toggles the switch's state every time it's pressed. Note that footswitch type (Momentary or Latching) is determined per footswitch, not per assignment.
|
|
|
|
|
|
|
|
|
|
4. **Press the desired Stomp A or Stomp B switch, move an expression pedal, or send a CC or note from your MIDI controller.** Alternatively, the block is assigned.
|
|
|
|
### Learn Controller
|
|
|
|
Use the following steps to quickly "Learn" a Controller assignment to a specific parameter using an expression pedal, switch, trigger, or MIDI type controller.
|
|
|
|
1. From the Home \> Edit screen, **press and hold the knob for an** ***unassigned*** **parameter you wish to control. Alternatively, tap the parameter to open the Parameter Panel and tap Learn Controller in the sidebar.** The Learn/Assign Control dialog appears (see below).
|
|
|
|
* **Note:** If the parameter has *already* been assigned, pressing and holding the knob jumps to the Bypass/Control screen with that parameter in focus.
|
|
|
|

|
|
|
|
2. **Engage the controller from which you wish to control the parameter:**
|
|
|
|
* Press a Stomp A or Stomp B switch (or a momentary footswitch connected to **CONTROL A/B** or  **C/D**).
|
|
|
|
* Strike a drum trigger or contact microphone connected to **CONTROL A/B** or  **C/D**.
|
|
|
|
* Move the built-in expression pedal (  only) or an expression pedal connected to **CONTROL A/B** or  **C/D**.
|
|
|
|
* Send a MIDI CC or note from your MIDI controller.
|
|
|
|
* Tap the X or Y controller axis icon in the dialog box.
|
|
|
|
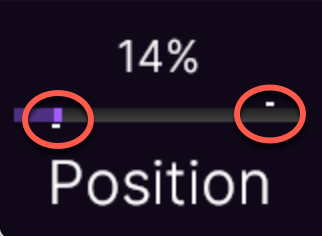
Once a controller is learned, the parameter's value appears white and small white nodes appear above and below the parameter slider, indicating the min/max range of control (see below):
|
|
|
|
|
|
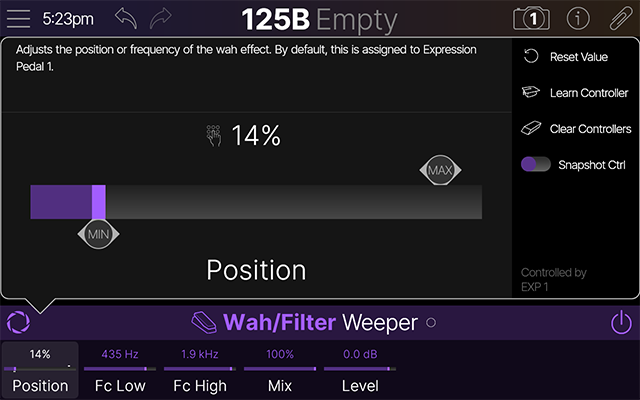
3. **To change the control range, tap the parameter.** The Parameter Panel appears (see below). **Tap and move the Min and Max nodes left or right to set the control range.** To reverse controller behavior, **move the Min note to the right of the Max node**.
|
|
|
|
* To quickly clear any assigned controllers from the parameter, tap **Clear Controllers** in the Parameter Panel's sidebar.
|
|
|
|
|
|
|
|
### Quick-Swapping Stomp Switches
|
|
|
|
If you want to change the location of Stomp mode switches (especially those with multiple items assigned or custom labels and LED ring colors), instead of manually reassigning everything, you can quickly swap their locations.
|
|
|
|
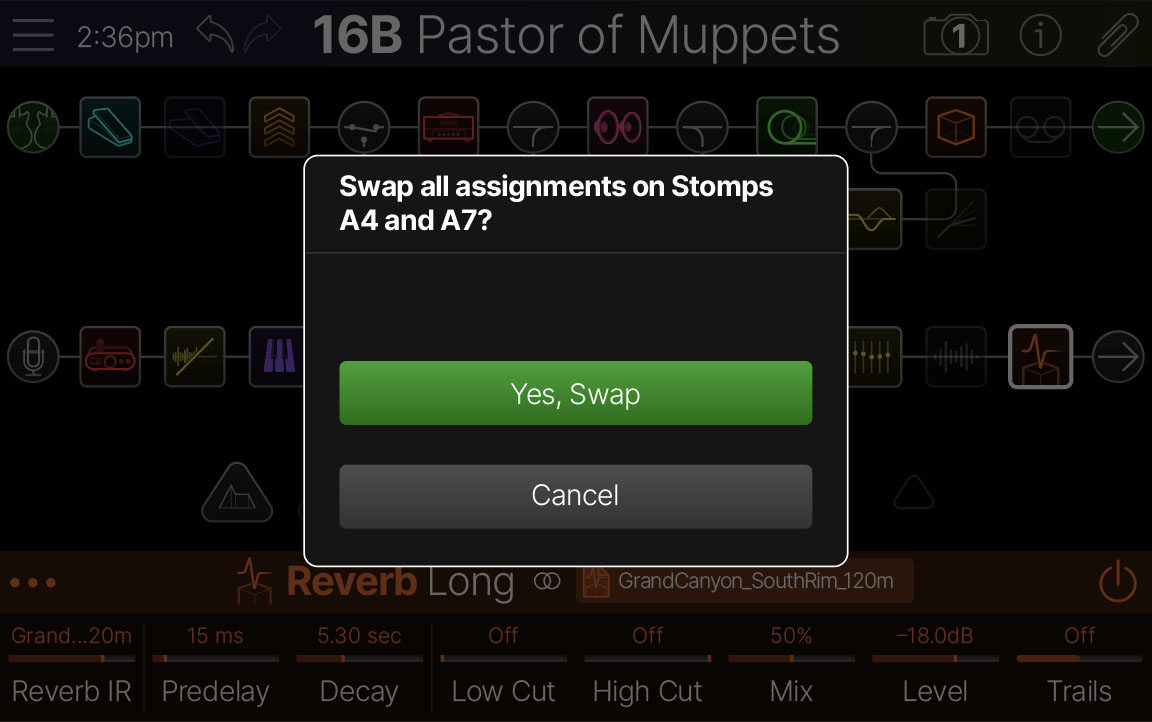
1. **Touch (but don't press) any two Stomp mode footswitches.**The following dialog appears:
|
|
|
|
|
|
|
|
2. **Tap Yes, Swap.**
|
|
|
|
### Customizing a Stomp's Label and Color
|
|
|
|
1. **Tap-hold an assigned Stomp A or Stomp B switch.** The Quick Stomp Assign dialog appears:
|
|
|
|

|
|
|
|
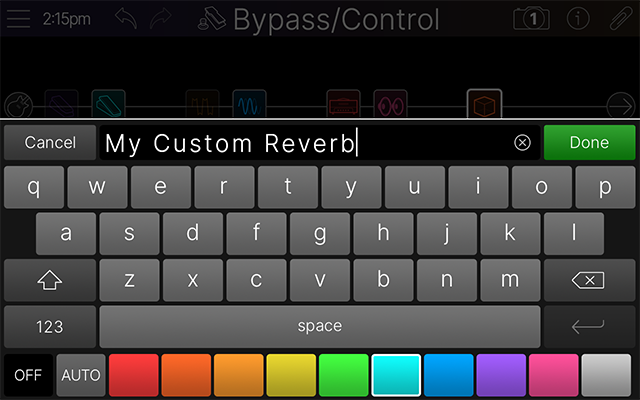
2. **Tap Label/Color**  **in the sidebar.** A keyboard appears (see below). **Enter the new label.**
|
|
|
|
|
|
|
|
3. **Tap the desired color swatch.** **Auto** matches the default color for the footswitch LED (Delays are green, Mods are blue, EQs are yellow, etc.) and **Off** disables the LED, regardless of the switch's bypass state.
|
|
|
|
4. **When finished, tap**  **.**
|
|
|
|
*** ** * ** ***
|
|
|
|
## The Bypass/Control Screen
|
|
|
|
Most bypass and controller assignments can (and should!) be accomplished by Quick Bypass Assign, Learn Bypass, and Learn Controller (as illustrated above). But you can also manually assign bypass to blocks---and controllers to parameters---from the Bypass/Control screen.
|
|
|
|
1. **Tap the Menu icon**  **and then Bypass/Control**  **.** Alternatively, **tap-hold any Home \> Edit parameter in the inspector.** The Bypass/Control screen appears.
|
|
|
|
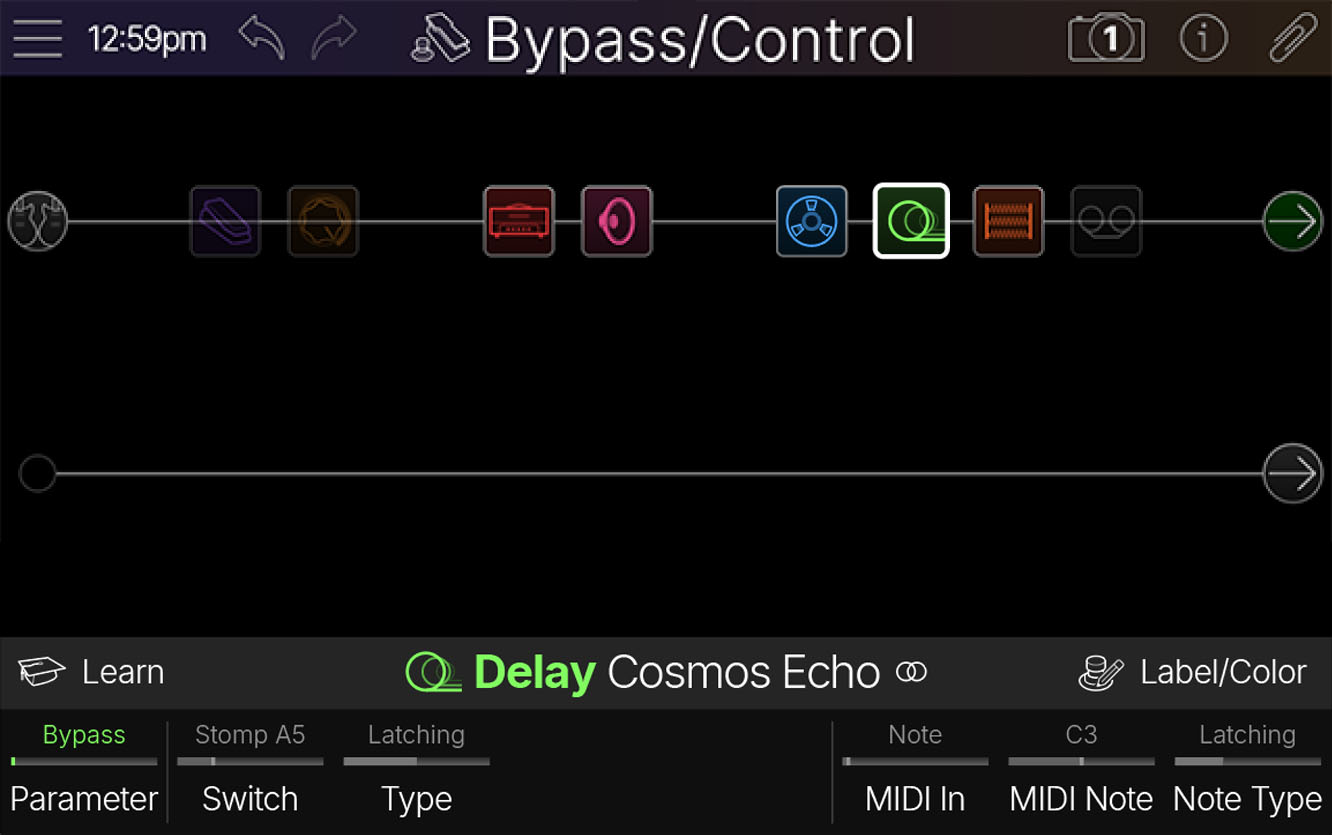
2. **Turn Knob 1 (Parameter) to choose what you want to control.** Different parameters appear on Knobs 2-8 depending on whether Knob 1 is set to **Bypass** (below left) or anything other than Bypass (below right).
|
|
|
|
|
|
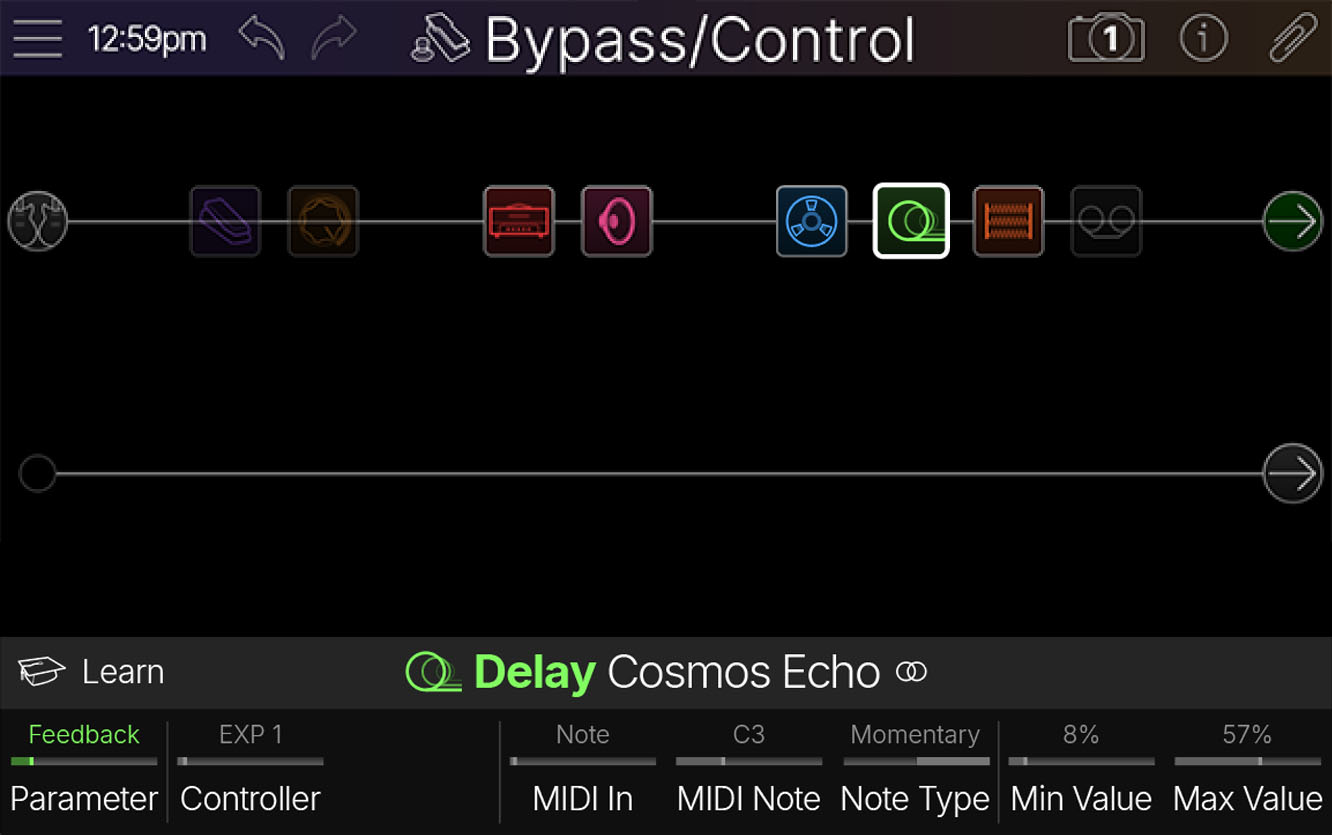
|
|
|
|
4. **Tap Learn in the inspector header.** If Knob 1 (Parameter) is set to **Bypass**, the Assign Switch dialog appears (below left). If Knob 1 (Parameter) is set to anything else, the Learn/Assign Control dialog appears (below right).
|
|
|
|

|
|

|
|
|
|
5. **Engage the controller (press a Stomp switch, move an expression pedal, strike a trigger, send a MIDI CC/note, etc.) to assign it to the parameter.**
|
|
|
|
Click to show Bypass/Control parameters...
|
|
|
|
### **When Knob 1 (Parameter) is set to Bypass:**
|
|
|
|
| **Parameter** | **Description** |
|
|
|---------------|------------------------------------------------------------------------------------------------------------------------------------------------------------------------------------------------------------------------------------------------------------------------------------------------------------------------------------------------------------------------------------------------------------------------------------------------------------------------------------------------------------------------------------------------------------------------------------------------------------------------------------------------------------------------------------------------------------------------------------|
|
|
| **Switch** | Selects the controller type for the Bypass assignment. |
|
|
| **Type** | Appears when Knob 2 (Switch) is set to any Stomp switch or external momentary footswitch. Determines the behavior for the switch: * **Latching:** The block is bypassed (or enabled, if already bypassed) whenever you press the switch. * **Momentary:** The block is bypassed (or enabled, if already bypassed) for as long as you hold the switch. **Note:** Footswitch type (latching or momentary) is determined *per footswitch*, not per assignment. |
|
|
| **Position** | Appears when Knob 2 (Switch) is set to an expression pedal. Determines the point within the expression pedal's travel where the block is enabled or bypassed. 0% is heel down; 99% is toe down. |
|
|
| **Wait** | Appears when Knob 2 (Switch) is set to an expression pedal. Determines how long Helix waits before bypassing the block; for example, you wouldn't want the wah to turn off every time you touched the heel down position in your big funk wah solo. |
|
|
| **Behavior** | Appears when Knob 2 (Switch) is set to an expression pedal. Determines how bypassing is handled. * When set to **Toggle** , bringing the pedal past the **Position** value toggles the block's bypass state, regardless of its current state (i.e., enabling it if currently bypassed and vice versa). * **Toe Down** and **Heel Down** *always* bypass the block at the designated Toe or Heel pedal position, regardless of the block's starting state. With **Heel Down** selected, the block always turns on when you cross the Position value and bypasses when you return below it. (Since these options always bypass the block, they can prevent snapshot settings from unexpectedly toggling your EXP-assigned block on.) |
|
|
| **MIDI In** | Determines the type of MIDI command assigned to bypass: * **None:** The block's bypass ignores incoming MIDI messages. * **Note:** The block can be bypassed by pressing MIDI notes (or drum pads) on a keyboard or other MIDI controller. * **CC0\~CC127:** The block can be bypassed by an incoming MIDI CC message. CC values 0-63 turn the block off; values 64-127 turn the block on. |
|
|
| **MIDI Note** | Appears when Knob 6 (MIDI In) is set to **Note**. Selects which MIDI note bypasses the block. Middle C is C3 on Yamaha^®^ keyboards, but other companies may consider it C4. |
|
|
| **Note Type** | Appears when Knob 6 (MIDI In) is set to **Note**. Determines the behavior of the MIDI note: * **Latching:** The block is bypassed (or enabled, if already bypassed) every time you press the key. * **Momentary:** The block is bypassed (or enabled, if already bypassed) for as long as you hold the key. |
|
|
|
|
#### **When Knob 1 (Parameter) is set to anything** ***other than*** **Bypass:**
|
|
|
|
| **Parameter** | **Description** |
|
|
|----------------|----------------------------------------------------------------------------------------------------------------------------------------------------------------------------------------------------------------------------------------------------------------------------------------------------------------------------------------------------------------------------------------------------------------------|
|
|
| **Controller** | Selects the controller type for the assignment. **Note:** On Helix Stadium XL devices, EXP 1, EXP 2, and EXP Toe are accommodated via the onboard pedal's toe switch. Please refer to the [**External Pedal and Switch Controller Configuration**](https://manuals.line6.com/en/helix-stadium/live/external-pedal-and-switch-controller-configuration.md) page for details. |
|
|
| **Type** | Appears when Knob 2 (Controller) is set to any Stomp switch or external momentary footswitch. * **Latching:** Toggles between Min and Max values every time you press the switch. * **Momentary:** The value changes for as long as you hold the switch and returns to its original value when you release it. **Note:** Footswitch type (latching or momentary) is determined *per footswitch*, not per assignment. |
|
|
| **MIDI In** | Determines the type of MIDI command assigned for control: * **None:** The parameter ignores incoming MIDI messages. * **Note:** The parameter's min and max values can be toggled by pressing MIDI notes (or drum pads) on a keyboard or other MIDI controller. * **CC0\~CC127:** The parameter can be controlled from an incoming MIDI CC message. |
|
|
| **MIDI Note** | Appears when Knob 6 (MIDI In) is set to **Note**. Selects which MIDI note toggles between min and max values. Middle C is C3 on Yamaha^®^ keyboards, but other companies may consider it C4. |
|
|
| **Note Type** | Appears when Knob 6 (MIDI In) is set to **Note**. Determines the behavior of the MIDI note: * **Latching:** The parameter toggles between min and max every time you press the key. * **Momentary:** The parameter changes for as long as you hold the key and returns to its original value when you release it. |
|
|
| **Min Value** | Sets the value range to be controlled. For example, if your controller is an expression pedal, Min Value sets the value sent from the pedal when it is moved to its heel position, and Max Value sets the value when it is moved to its toe position. |
|
|
| **Max Value** | Sets the value range to be controlled. For example, if your controller is an expression pedal, Min Value sets the value sent from the pedal when it is moved to its heel position, and Max Value sets the value when it is moved to its toe position. |
|
|
|
|
### Bypass/Control Action Panel
|
|
|
|
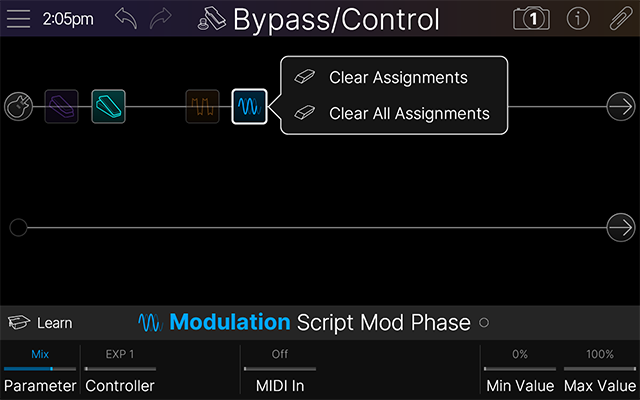
1. **While on the Bypass/Control screen, tap the selected block.** The Bypass/Control Action Panel appears:
|
|
|
|
|
|
|
|
* Tap **Clear Assignments** to clear all bypass and controller assignments from the selected block.
|
|
|
|
* Tap **Clear All Assignments** to clear all assignments from *all blocks* within the current preset. A dialog appears: "Clear Bypass and Controller Assignments from all blocks?" Tap **OK**.
|
|
|
|
**Note:** To quickly clear an individual parameter's controller assignments, from the Home \> Edit screen, **tap the parameter to open the Parameter Panel and tap Clear Controllers in the sidebar.**
|
|

|
|
|
|
*** ** * ** ***
|
|
|
|
## XY Controller
|
|
|
|
Helix Stadium's screen can be used as a large performance-based touch controller where one or more parameters are assigned to the X or Y axis. Each axis on the XY Controller can also be used to transmit MIDI CCs via the [**Command Center**](https://manuals.line6.com/en/helix-stadium/live/command-center.md).
|
|
|
|
Even though they look similar, Focus view and the XY Controller screen are very different. While Focus view (at least for most amps and effects) is used for quickly dialing in five distinct sounds of that particular block (with Focus zones in the four corners and center), the XY Controller is different in that *any parameter from any block(s)* can be assigned to an XY axis (with axis extremes along each edge). Just remember: Focus view is meant for *editing* a single block, XY Controller if meant for *real time control* of multiple blocks during a performance.
|
|
|
|
### Assigning Parameters to the XY Controller
|
|
|
|
1. Press-hold the knob for an *unassigned* parameter. The Learn/Assign Control dialog appears:
|
|
|
|

|
|
|
|
2. **Tap the X or Y axis icon. Repeat steps 1 and 2 for any other parameters you want to assign.** See [**Learn Controller**](https://manuals.line6.com/en/helix-stadium/live/bypass-and-controller-assign.md#quick-controller-assign).
|
|
|
|
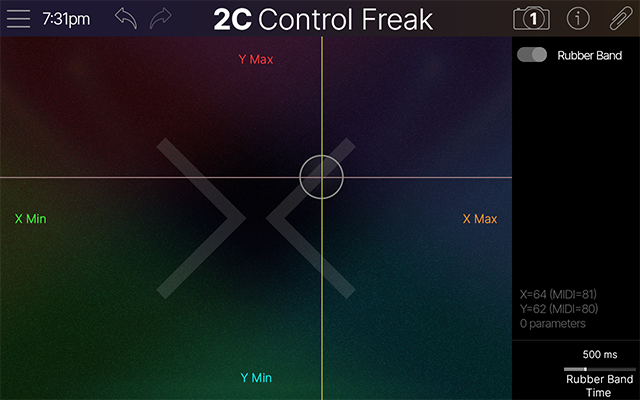
3. **Press the XY Controller button**  (to the right of the Save button). The XY Controller screen appears:
|
|
|
|
|
|
|
|
4. **Tap the circular XY node and move it around the screen to adjust all assigned parameters.**
|
|
|
|
* By default, lifting your finger causes the XY node to snap back to its original position. If you prefer the XY node stays where you left, tap the Rubber Band toggle **Off**.
|
|
|
|
* The time it takes the Rubber Band to return is determined by Knob 8 (Rubber Band Time).
|
|
|
|
* Read-only text appears in the sidebar, showing the current X and Y positions (0-100) as well as transmitted MIDI CC values (0-127) in case you've assigned the X and/or Y axis to MIDI CC from the [**Command Center**](https://manuals.line6.com/en/helix-stadium/live/command-center.md). |